What is Uniswap?
Uniswap is a Decentralized Exchange (DEX) protocol built on the Ethereum blockchain, and used for the swapping of crypto coins that were also build on the Ethereum Blockchain, also known as ERC-20 tokens. It is the biggest DEX by volume.
How to use it
Uniswap provides an easy-to-use exchange application directly on their website where you can connect your wallet, select the crypto you want to exchange for, and swap.
Additionally, there are many other projects that utilize the Uniswap ecosystem, such as MetaMask, that allow you to use Uniswap without leaving your MetaMask wallet to swap crypto. To view all of the projects currently utilizing Uniswap for, visit Uniswap’s site here.
Key features
- Automated Market Making (AMM): Uniswap uses an automated market making model, which means that trades are executed against liquidity pools rather than through a centralized order book. Liquidity providers deposit pairs of tokens into these pools, and smart contracts automatically facilitate trades based on a mathematical algorithm.
- Liquidity Pools: Users can become liquidity providers by depositing pairs of tokens into liquidity pools. Each pool contains two tokens in a specific ratio. Liquidity providers earn fees from trades that occur in the pool, and they receive liquidity provider (LP) tokens representing their share of the pool.
- Decentralization: Uniswap operates on the Ethereum blockchain, providing a decentralized and censorship-resistant trading environment. Users interact with the protocol using their Ethereum wallets, and the smart contracts handle the trading logic.
- Token Swapping: Users can swap one ERC-20 token for another directly from their wallets using the Uniswap interface. The swap prices are determined by the ratio of the two tokens in the liquidity pool.
- Fees and Incentives: Traders using Uniswap pay a small fee for each trade, which is distributed to liquidity providers. This fee incentivizes users to contribute liquidity to the pools.
- UNI Token: UNI is the native governance token of Uniswap. Holders of UNI have the ability to participate in the governance and decision-making processes of the Uniswap protocol, including voting on proposals and changes to the protocol.
- Permissionless Access: Uniswap allows users to trade tokens without requiring an account or KYC verification. Users only need an Ethereum wallet to interact with the protocol.
Step-by-step guide (using Ledger hardware wallet)
We want to begin by saying that unless you are directly trading ETH for another coin, you will need enough ETH in your wallet to pay the transaction (gas) fees. For example, if you are wanting to trade USDC on Etherum, you will still need to have enough ETH to pay the fees as you won’t be able to complete the transaction without it. This holds true with the other exchanges built on and for Solana, Avalanche, Binance Smart Chain, etc. So before you start this process, be sure you have enough ETH to cover the transaction fees or else you won’t be able to complete the swap. If you reach the final step to Confirm Swap and the button is greyed out, it is because you don’t have enough ETH to cover the fee.
In our example, we will show you how to swap $500 worth of USDC (Ethereum based stablecoin) into a gaming coin built on the Ethereum network called SuperVerse (SUPER is the symbol) using our Ledger Nano X hardware wallet.
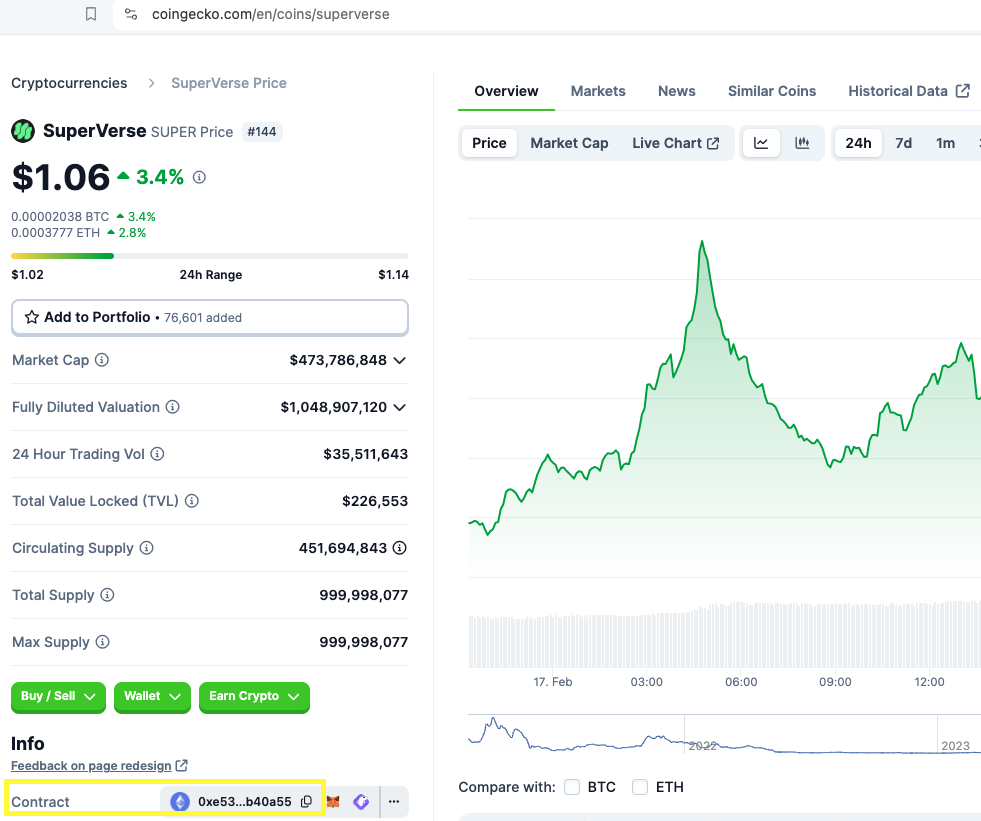
You will need SUPER’s Ethereum contract address to input into Uniswap. This can be found on CoinGecko, which tracks all crypto coins. For SUPER, we took the contract found at CoinGecko here and used the Copy function (on the right side of the yellow highlighted section below) to avoid any typos:

- Once you have the contract address ready to go, head to the Uniswap swapping site/application.
- Connect your wallet, in this case we are connecting a Ledger hardware wallet.
- Click Connect in the top right on the Uniswap website. If your wallet isn’t listed here, like Ledger, select WalletConnect. This brings up a QR code, with more options at the bottom.
- For Ledger users, click View All at the bottom right and search for Ledger Live.
- This will open your Ledger Live application. Check off the box to add your Ethereum account that holds the crypto you are swapping, again in this case will be USDC. Click Connect.
- This will redirect you back to the Uniswap website with your now connected Ledger device.
- On the Uniswap site, click the top dropdown and select the crypto you are trading, then click the bottom dropdown for the crypto you want to receive. In the search section, paste the address you copied in Step 1 for SUPER’s contract, and select the crypto to proceed.
- Enter the amount of crypto you want to trade. The estimated amount of SUPER you will receive in return will auto populate. You are ready to select Swap, and then Confirm Swap on the next screen. This does not finalize the swap, and you still need your physical Ledger to approve the transaction so have that ready.
- Click Open Ledger Live. This brings you back to the Ledger Live app. Click Continue, and Ledger will ask you to connect your hardware device if it isn’t already.
- This screen allows you to review the SUPER contract address as well.
- Unlock your Ledger device by entering your PIN, and the Ledger Live app will ask you to open the Ethereum account on your Ledger.
- Go back to the Uniswap website.
- Once you enter your PIN on your Ledger to unlock the device and go into the Ethereum account, the transaction will automatically pop up on your device. It will ask you to scroll through the “Transaction Hash,” and finally when you get to the Approve screen, click both Ledger buttons at the same time. The transaction is submitted and Uniswap will let you know when it is complete!
- Disconnect your Ledger from Uniswap.
Here is a video demo of the above transaction (not shown is us using the Ledger device in our hands):
Step-by-step guide (using software wallet)
We want to begin by saying that unless you are trading ETH for another coin, you will need enough ETH in your wallet to pay the transaction (gas) fees. This holds true with the other exchanges built on and for Solana, Avalanche, Binance Smart Chain, etc. So before you start this process, be sure you have enough ETH to cover the transaction fees or else you won’t be able to complete the swap. If you reach the final step to Confirm Swap and the button is greyed out, it is because you don’t have enough ETH to cover the fee. We run into this in our video demo below, where you get to the final step and it fails because we only have $30 worth of ETH, and the current network fees are $68 worth of ETH.
In this example, we will show you how to swap $500 worth of USDC (Ethereum based stablecoin) into a gaming infrastructure coin built on the Ethereum network called Beam (BEAM is the symbol) using our software-based Trust Wallet on a mobile phone.
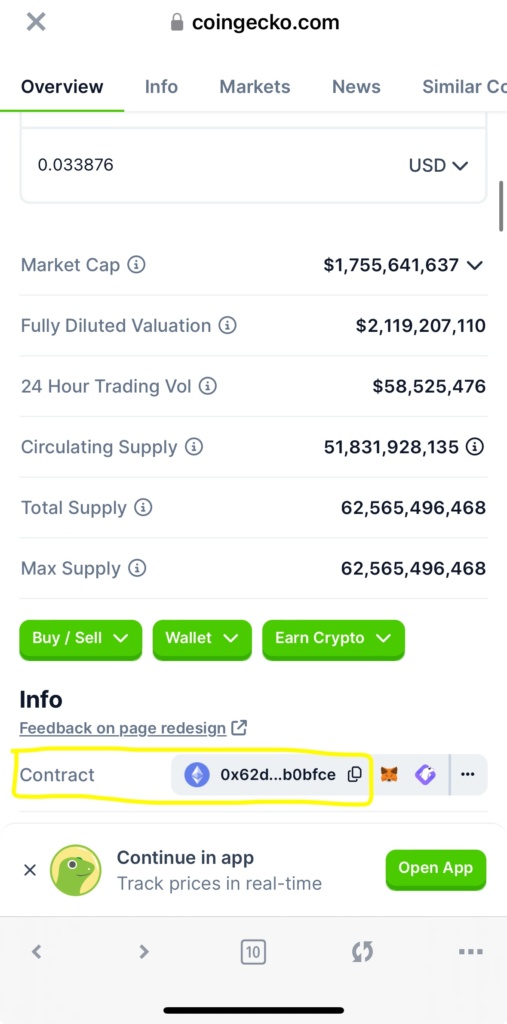
You will need Beam’s Ethereum contract address to input into Uniswap. This can be found on CoinGecko, which tracks all crypto coins. For BEAM, we took the contract address found at CoinGecko here and used the Copy function (on the right side of the yellow highlighted section below) to avoid any typos:

- Once you have the contract address ready to go from CoinGecko, head to the Uniswap swapping site/application.
- On the Uniswap site, click the top dropdown and select the crypto you are trading out of, then click the bottom dropdown for the crypto you want to receive. In the search section, paste the address you copied in from CoinGecko for BEAM’s contract, then click on BEAM proceed.
- Connect your wallet, in this case we are connecting our Trust Wallet.
- Click Connect in the top right on the Uniswap website. If you are using the browser inside of the Trust Wallet application, it will automatically connect.
- If you are using the desktop website, you will need to click WalletConnect, which produces a QR code. Open your Trust Wallet application on your phone and click on the QR code scanner
 , and scan the QR code that WalletConnect produced.
 - Lastly, you’ll need to scroll to the bottom of the page of your Trust Wallet app, and click Connect to finish the process.
- If you are using the desktop website, you will need to click WalletConnect, which produces a QR code. Open your Trust Wallet application on your phone and click on the QR code scanner
- Click Connect in the top right on the Uniswap website. If you are using the browser inside of the Trust Wallet application, it will automatically connect.
- In the top section that shows the crypto you are swapping, it will show the balance of that coin in your wallet. Type in the amount of that crypto you want to swap, or if it is all of it, select Max.
- When entering how much crypto you are swapping, an estimated amount of BEAM that you will receive auto populates, and you are all set to select Swap, and then Sign and swap on the next screen. This does not finalize the swap, so lastly you need to “Confirm the Signature Request.”
- If you have enough ETH to cover the transaction fees, you are done and your swap will go through after a minute or so. If you didn’t have enough ETH like us in the video demo, the transaction won’t go through and will tell you how much the network fee costs to complete the trade. Unfortunately our estimated network cost was more than the original quote.
- *It is always best to have more than enough ETH to cover the network costs, because if you get to the end and the transaction is allowed to fail, you will likely lose a little bit of ETH for the failure.
Here is a video demo of the above transaction:


