Review
THORChain is one of our favorite projects, and one that we think is among the most important in all of crypto. They are creating an entire Decentralized Finance (DeFi) ecosystem, and one that is free of a single controlling entity subject to a country’s rules, or imaginary boundaries. Between permission-less trading/swaps between different blockchain networks including Bitcoin, earning passive income on your crypto, and borrowing against your crypto, THORChain brings everyone one step closer to having everything you need to “be your own bank.” They are one of only a few, and certainly the biggest, platforms that allows you to swap native assets for native assets, such as Ethereum for Bitcoin or vice versa. No need to create an account, no Know Your Client (KYC) personal information input, no need to get approval, no one freezing your funds or telling you what you can or can’t buy. Just simply connect your wallet, swap, earn yield, and borrow at your leisure.
It is likely that in the future, you will be using THORChain behind the scenes without even knowing it as more people go from blockchain to blockchain without using centralized exchanges. While THORChain is the underlying technology, you need to use an interface that integrates with the THORChain engines. A few examples are THORSwap and ShapeShift, but several more are now popping up, such as Trust Wallet, Lends, and THORWallet.
Below, we will walk you through how to utilize the main attractions for THORChain mentioned above, which are swaps, Savers, Liquidity Providers, and lending:
How to access THORChain
Being that THORChain is the underlying technology, it doesn’t have a direct application like Chainflip, you will need to use an interface that integrates THORChain. Two of the most popular interfaces are THORSwap and ShapeShift. We use both options in our step-by-step guides below.
Swaps on THORChain: How-to
THORChain released an upgrade in 2023 called Streaming Swaps. This potentially slows down the amount of time it takes for a swap to occur, but greatly reduces the slippage and thus, helps you receive more crypto in return that in the past. This is a big step towards mass adoption of Decentralized trading as it brings the total fees more in line with Centralized Exchanges.
In our example, we will use the THORSwap interface to swap USDC on Ethereum for USDC on Avalance so that we could complete our purchase of SHRAP, a gaming token on the Avalanche network. We are also using our Ledger hardware wallet, so your wallet connecting process may slightly differ.
We will assume your wallet is already funded with USDC, but if not, visit our page for sending and receiving funds to your wallet to transfer funds to your wallet.
- Head over to THORSwap’s website, and click Enter App at the top right.
- Step 2 and 3 are interchangeable, but in our video demo, we first change the top dropdown from the default ETH to the crypto we want to swap, which is USDC on Ethereum (ERC-20). Then we change the bottom dropdown from the default BTC to the crypto we want to receive, which is USDC on Avalance (AVAX).
- It is time to connect your wallet (skip this part if you are using a Software Wallet and move to the bulleted point below). You’ll need to connect your Ledger via USB to your computer, or if you have the Nano X, you can connect to your phone through Ledger Live via Bluetooth. For this step, you will need to have the Ledger unlocked and the Ethereum application opened before proceeding to the next step.
- If you are using a Software Wallet, choose your wallet from the list or select WalletConnect and scan the QR code from your personal Software Wallet’s QR code scanning feature.
- Back to THORSwap, select the Ledger option underneath Hardware Wallets, then select the Ethereum chain icon if it isn’t already checked. Click on I agree to the Terms of Service, and Connect Wallet.
- You will see a Connecting ETH Ledger in the bottom right of THORSwap, and if all goes well, it will say Successfully connected ETH Ledger right after. This means you are set to proceed with the swap.
- You will see your available balance of USDC. Type in the amount you want to swap, which in our video demo we use 500. This will auto generate the swap amount expected to be received in return, in this case is 498.058
- If you want, you can click the Settings gear icon to specify your transaction speed, which also correlates to transaction costs. The faster the transaction, the higher the fee.
- The last thing needed on this page is to enter the recipient address. This is where you want the crypto to end up after your swap.
- In our video, you will see us load up our Trust Wallet browser extension, scroll to the crypto we are receiving, click on Receive, then copy and paste the address into the Recipient Address section in THORSwap.
- Click Swap, which brings up a second screen asking you to Confirm.
- If you are using a Ledger, a popup will appear on your Ledger device asking you to review a transaction. Use the right side button to scroll through the transaction until you see Approve, then click both buttons at the same time to approve.
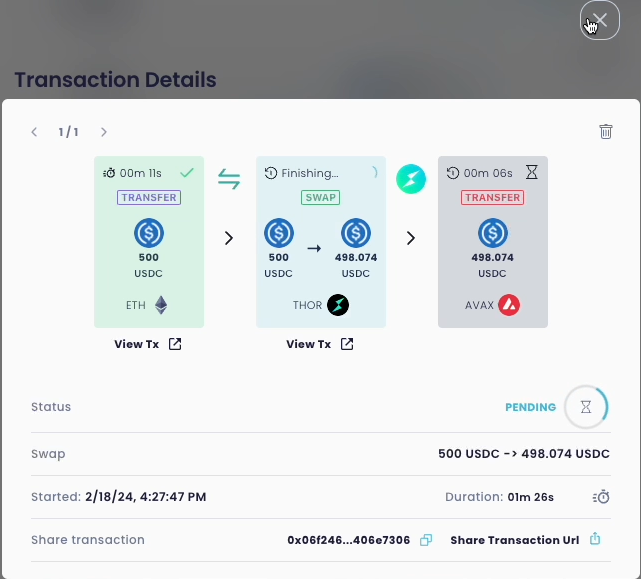
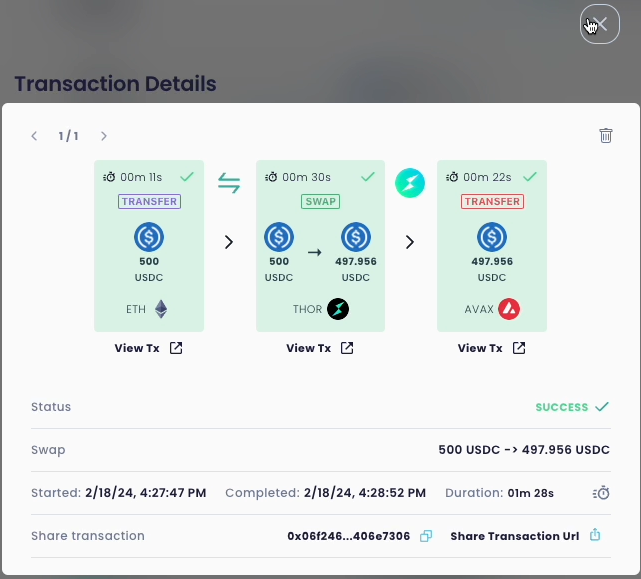
- The Swap will now show pending in THORSwap. Depending on the size of the swap and which option you selected, this could take a few minutes to a several hours. Click on View Details to monitor the swap, and this view will change its status to Success when finished, as seen below:


Video demo:
Earning yield on THORChain, via Savers
One knock on crypto by traditional finance is they don’t pay dividends or interest like many traditional stocks and bonds. However, one avenue for earning rewards on your crypto is to stake them through THORChain’s Savers program. To keep this simple, you are providing liquidity to THORChain via a smart contract. The way you receive rewards is when other people use THORChain to swap crypto, you receive a portion of the transaction fees that THORChain receives. When swap volumes are high for the crypto you are providing liquidity for, you earn more rewards. When volume is low, you will receive less rewards. Because of this variable, THORChain is not able to provide specific return rates. You are, however, able to view the previous 7 days rates here on THORSwap.
If you want to keep track of your rewards without constantly needing to connect your wallet and visit THORSwap, download the THORYield mobile app on the App Store or Google Play. Select New Account, name it whatever you’d like, then enter your crypto wallet’s address for the asset you are putting into Savers. You will be able to view your rewards and balance here going forward.
Here is a step-by-step guide for depositing into Savers using THORSwap, but keep in mind it is just as easy to use some other platforms, such as Shape Shift.
- Head over to THORSwap’s website, and click Enter App at the top right.
- In the top left, click on Earn.
- Select the crypto you are depositing to earn rewards on, and in our video example will show us using ETH.
- It is time to connect your wallet (skip this part if you are using a Software Wallet and move to the bulleted point below). You’ll need to connect your Ledger via USB to your computer, or if you have the Nano X, you can connect to your phone through Ledger Live via Bluetooth. For this step, you will need to have the Ledger unlocked and the Ethereum application opened before proceeding to the next step.
- If you are using a Software Wallet, choose your wallet from the list or select WalletConnect and scan the QR code from your personal Software Wallet’s QR code scanning feature.
- Back to THORSwap, select the Ledger option underneath Hardware Wallets, then select the Ethereum chain icon if it isn’t already checked. Click on I agree to the Terms of Service, and Connect Wallet.
- You will see a Connecting ETH Ledger in the bottom right of THORSwap, and if all goes well, it will say Successfully connected ETH Ledger right after. This means you are set to proceed with the swap.
- Type in the amount of crypto you want to deposit, which in our example is 1 ETH.
- You will see the Time to break even update with the number of days estimated for you to recoup the transaction fees you will spend to enter the Savers program. In this example, it shows you’ll need 91 days to break even on 1 ETH at the prior 7 days return of 3.46% before you are in profit.
- Click Deposit, then review the popup screen and review the details, then click Confirm.
- This sends a notification to your Ledger device to review the transaction. Scroll by pressing the right button until you see Approve, then click both Ledger buttons at the same time to approve.
- You are done! Wait for your deposit to complete and start earning rewards.
- To track your rewards, download the THORYield mobile app and enter your wallet address for quick access.
Liquidity Providers (LP)
THORChain also offers a Liquidity Provider (LP) option in addition to the above Savers. The major difference is that in the LP option, you are exposed to THORChain’s native token, RUNE, and its market performance. In the pool, your position becomes 50% of the crypto you deposit, and 50% in RUNE. Liquidity Providers earn a greater percentage of transaction fees compared to the Savers program. However, this should be thought of as more of a bet that RUNE will increase in value more than the other crypto you are depositing. This is because once you are in the pool, you are not entitled to remove the exact amount of crypto you deposited initially because of the rebalancing.
Here is an example using an hypothetical price of $50k/ BTC, and $5/ RUNE:
Let’s say we deposit 1 BTC at $50k, and the RUNE price is $5. As we mentioned above, your position is technically now 50% BTC and 50% RUNE, so let’s say $25k worth each. If RUNE doubles and goes to $10 while Bitcoin price stays the same, the amount of Bitcoin you can withdraw from the pool increases. Your RUNE portion is now worth $50k (the original $25k doubled when RUNE went from $5 to $10), and your BTC portion is still worth $25k, for a total value of $75k. You can now withdraw 1.5 BTC even though you only deposited 1 BTC.
On the other hand, if BTC was the one that doubled and RUNE stayed the same, the opposite can occur. If Bitcoin went to $100k, your $25k worth is now worth $50k, but RUNE stayed the same and is still worth $25k, for a total of $75k. With Bitcoin at $100k and your pool value of $75k, if you withdrew from the LP you would have .75 BTC, which is less than you deposited.
Remember, if you choose to participate as a LP, you are now exposed to two assets.
You can access the liquidity pool in two ways:
- Single-sided (asymmetric) deposit.
- This means you are depositing a single asset, such as Bitcoin, to the pool. When you deposit your Bitcoin, 50% of it is immediately sold for RUNE as your position must be a 50/50 ratio.
- If Bitcoin increases in value against RUNE, you are not entitled to that whole profit as you are now 50% exposed to Bitcoin, and 50% in RUNE.
- Dual-sided (symmetric) deposit.
- This means you are depositing an equal amount of both your crypto of choice, and RUNE in US Dollar terms.
Video demo of how to supply USDC into the USDC LP, using THORSwap:
Lending/borrowing against your BTC and ETH
UPDATE: THORChain lending feature has been sunset. This may later become available on the application layer, but the integration directly on THORChain’s Blockchain has been removed. Existing loans are NOT affected.
THORChain only allows lending to two assets: Bitcoin and Ethereum. And they max the limits at 200% collateral, so if you deposit $1k USD, you can only receive $500 USD as a loan.
Now for the good stuff that has the potential to be revolutionary:
No liquidation, no expiration, and no interest! That is right, you are borrowing at a rate of 0.0% with no expiration and no possibility of getting liquidated. If Bitcoin is trading at $50k USD, you can take out $25k USD for free (just pay transaction fees, which may contain some slippage). To get your Bitcoin back, you have to pay back that $25k at a later date with any asset, as long as the value is higher than the debt. Loans can’t be partially repaid and you must wait 30 days after starting the loan to close it.
You also have the option of receiving a different crypto back in return, such as THORChain’s own token, RUNE, or ETH. The risk of doing this is if RUNE or ETH go down in value, you would need to cover the difference in value in order to get your Bitcoin back. If you are betting on the crypto you receive back going up, you are effectively placing a leveraged bet on that crypto.
We realize this sounds too good to be true, and you may want to wait some time before jumping in as this is a new feature as of last year. But the early returns are promising and they continue to scale the project slowly to contain risk.
How it works:
We will try to give a non technical description here, but if you want to review the technical aspects, visit THORChain’s website here.
In our example, we will assume a loan beginning with a Bitcoin price of $50k, and a RUNE price of $5.
Step 1: Deposit BTC
Step 2: The program immediately swaps your BTC for THORChain’s RUNE token. So $50k worth of BTC becomes $50k worth of RUNE.
Step 3: Half of this RUNE is burnt (removed from circulation)
Step 4: The other half is then used to swap into the asset you receive back, let’s say USDC. Since THORChain can loan 50% of what you deposit, you will receive 50% of your $50k worth of Bitcoin, or $25k USDC. You are now free to do whatever you wish with that $25k.
So who has my Bitcoin?
No one. Your Bitcoin was used to keep the Liquidity Pools healthy and functioning and was swapped to RUNE during your deposit. Half of that RUNE was burnt, or taken out of circulation.
What happens if Bitcoin drops by 60% in value?
If Bitcoin goes from $50k to say $20k, nothing happens to your loan. Since no one is holding the collateral, THORChain does not care and is not at risk.
So who is it at risk?
Potentially RUNE holders/investors. Remember how we mentioned half of the RUNE is burnt at the beginning of our example during the start of a loan? Well the opposite is true at the closing of a loan. When someone pays off a loan, THORChain has to create new RUNE (called minting) in order to buy back that 1 Bitcoin. This could cause a decrease in the value of RUNE due to more RUNE being added to circulation and needing to be sold to the market. This leads us to the next part of our example: closing the loan.
How do I get my BTC back?
Let’s say 2 years later, Bitcoin is now worth $100k and RUNE is worth $10. You want to pay back your $25k USD loan and get back your Bitcoin worth $100k. To do so, you will deposit your $25k worth of your supported crypto of choice and we will use USDC in our example again. Your $25k loan repay again immediately gets swapped for RUNE, and since RUNE is now worth $10, that means 2,500 RUNE ($25k divided by $10 RUNE). But this isn’t enough RUNE to buy back my 1 Bitcoin! THORChain will then need to come up with the difference of $75k USD to buy it back. This is done by minting 7,500 RUNE worth $75k, to combine with your $25k loan repay. This $100k is now used to buy back your 1 BTC and deliver it back to your wallet.
What are the risks?
That is the debate. The major risk is the minting of RUNE, which can significantly dilute the RUNE in the marketplace and decrease in value. If this happens, THORChain will have to mint more and more to buy your collateral back, which also causes the price of RUNE to further decrease, which means when someone else closes their loan, THORChain would have to mint more RUNE than when the price was higher. So wouldn’t they print a ton of RUNE and drop the price of the token?
However, this is the reason for the slow rollout and scaling of the program. If more and more loans are taken out while others are being repaid, they could net each other out or ideally, have more RUNE getting burnt than minted. Additionally, if the price of BTC drops in value, it is more unlikely that the loan will be paid back at that time, which means less new RUNE getting minted. However, the total supply cannot exceed 500 million RUNE, so there is a circuit breaker in the design.
If all borrowers close their loans at the same time, that could mean there might be a problem. But again, with the scaling and lending caps in place, THORChain is working to build this out for the long run.
What happens if most or all loans are closed out at the same time?
THORChain built in a circuit breaker to contain risk. If loan closings require the total supply of RUNE to exceed 500 million RUNE coins, THORChain reserves step in to help instead of minting more RUNE. This would officially end the lending program for the future.
When do you I need to repay the loan?
Never. If your collateral that you took out a loan (BTC or ETH) on goes to zero, it doesn’t matter. If the value of the collateral doubles and you want to get your BTC or ETH back, repay the dollar amount that you borrowed, with no interest, and you’ll receive your collateral back.
Step-by-step guide:
If you are lucky enough to find this when there is room in THORChain for additional loans (they hit their caps pretty quickly as you can imagine, there are a lot of people interested in 0 interest loans!), here is how you access it:
You currently have three interfaces that support Lending: THORSwap, ShapeShift, and Lends. We will use ShapeShift in this example:
- Head over to ShapeShift’s website, and connect the wallet of the crypto you are wanting to lend against, either BTC or ETH. We are using ETH in the video demo below.
- Once connected and inside the application, click Lending towards the top left corner.
- Select the crypto you are depositing to loan against (BTC and ETH are the options), and in our video example will show us using ETH.
- On right right hand side under Borrow, the top portion with say Deposit ETH (or BTC if you are using that).
- Then select the asset you want to receive in return, which we search for and select USDC on Ethereum.
- If the asset you are receiving back is also on Ethereum, you may not need to enter the receiving address. If you choose to receive back Bitcoin, you will need to enter your Bitcoin address in the recipient section as the address differs from your ETH address.
- The amount you can borrow auto fills in, which works out to 50% of what you are depositing.
- Here you will be able to see the total fees incurred for this loan and the approximate time it will take for the loan to process, aka for the USDC to end up back at your wallet.
- Select Borrow, and in the next screen review the transaction one more time before hitting Confirm and Borrow.
- This will send a notification to your wallet to review the transaction and finally submit it for the official transfer. If you are using a hardware Ledger wallet, you will have to scroll through the screens until you get to the Approve screen, then click both buttons at the same time to approve the transaction.
- Watch the transaction to completion, and your new crypto should arrive to your wallet around the estimated wait time shown in Step 6.
Video demo of a ShapeShift loan:


